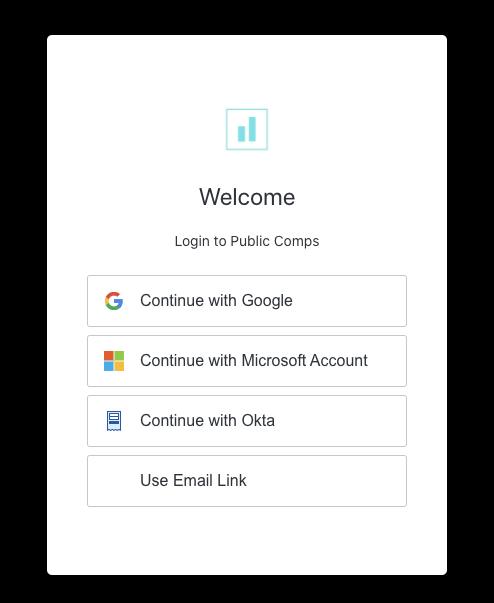
Adding Stytch to our Auth0 Login

We currently use Auth0 as our primary authentication provider for our application because it’s very easy to add multiple ways of authentication, especially using Google, Outlook, and Okta. We did have a glaring issue: we didn’t have a way to provide logins to people that didn’t use any of the three! We could easily add a password to our product, but we avoided it because we would then have to deal with password resets.
Stytch provided a perfect solution by allowing users to authenticate simply by entering their email. A link is then sent to their email, and clicking on it will authenticate them into the product. This is better because:
- The user doesn't have to memorize a new password or reuse an old one
- Less drop off from log in to product from typos & forgotten passwords
- Less help requests for resetting passwords
While Auth0 does provide a magic link solution, it has some limitations:
- Only works when request & response are in the same browser. This is especially problematic with iOS users, since they can't change their default browser
- It doesn’t integrate directly integrate with their new Universal Login. This is especially important because we use their new one, and their old one doesn't look as nice.
We wanted to keep our Auth0 login flow since it's easy to add additional login methods, but wanted to add Stytch's high quality passwordless login into the authentication page. Extending Auth0's new Universal Login is a bit tedious, but here's how we did it.
Note that there is no UI to customize the new Universal Login, you must use https requests to customize the new universal login. To use the customization API, you need to get a management token to use the API. While the examples in the Auth0 docs pass html strings to the data field, I recommend doing your work in a file and passing the file contents.

Here are the contents of the file:
<!DOCTYPE html>
<html>
  <head>
    {%- auth0:head -%}
  </head>
  <body class="_widget-auto-layout">
    {%- auth0:widget -%}
  </body>
  <script>
    const magicLinkLocation = 'https://publiccomps.com/auth/magic_link';
    var forms = document.getElementsByTagName('form');
    const parent = forms[0].parentNode;
    const newButton = document.createElement('div');
    newButton.onclick = function () { window.location = magicLinkLocation };
    parent.append(newButton);
    const cssClass = document.getElementsByTagName('button')[0].className;
    newButton.innerHTML = '
      <a href="'+ magicLinkLocation +'">
        <button class='+ cssClass + ' onclick="return false;">
            <span>Use Email Link</span>
        </button>
      </a>';
  </script>
</html>
Everything in the body is boilerplate, the customization all happens in the script tag.
- I assign the magicLinkLocation variable to the passwordless login page.
- I then scan the document for forms so I can attach a new button to it’s parent.
- The css on the Auth0 universal login page seems to be generated dynamically so I scan the page for buttons and copy over the class to cssClass.
- I add a window location onclick along with the href because the page blocks the redirect if the href is alone. I keep the href in there so the browser will display the link when hovered.
And voila, we added a path to use a Stytch's passwordless login to Auth0's authentication page!